Organiser Guide › Running an event › Setting up your series
Organiser
Setting up your series
The series is the home base for your festival. The settings here apply across every edition of it — so you fill them in once, and every future run inherits them. Think of this screen as the hub you return to whenever something about the whole festival changes.
The series hub
After you pick a series you'll see a screen headed "Configure your series" with a reminder underneath: "These apply across every edition…". There's a lot on this screen, but it's laid out simply.
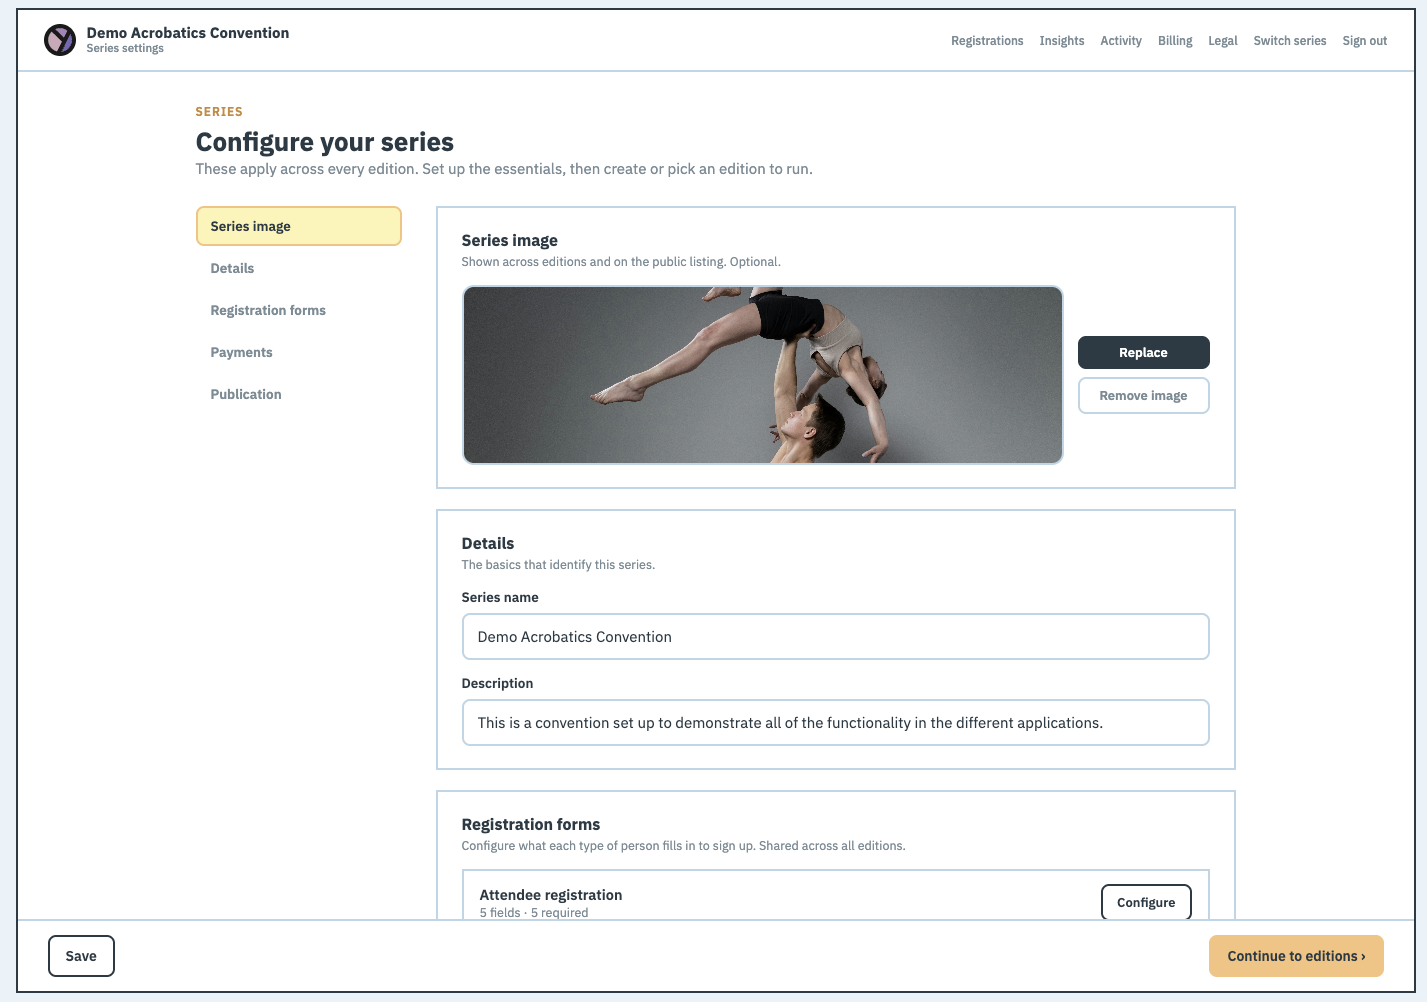
- Down the side are five sections — Series image, Details, Registration forms, Payments, and Publication (the last one is how you make the series public, once everything else is ready).
- Along the top are links to other areas you'll use later once your festival is running — Registrations, Insights, Activity, Billing, Legal, Switch series, and Sign out.
- At the bottom are Save and Continue to editions ›.
Press Save whenever you like. You can stop part-way and come back — nothing here is shown to the public, and your entries are kept for next time.
Series image
This is the picture shown for your festival across all its editions — a logo or a photo that captures the feel of it. Upload one from your computer. If you ever want to start over, Remove image clears it again.
Details
Two simple boxes. Series name is what your festival is called, and Description is a short paragraph telling people what it's about. Keep the description friendly and brief — a sentence or two is plenty.
Registration forms
A registration form is simply the set of questions people answer when they sign up. Different kinds of people need different questions, so there's one form for each kind:
- Attendee registration — the people coming to take part.
- Teacher registration — the people leading workshops.
- Volunteer registration — the people helping run things.
Each one has its own Configure button that opens the form editor. Because these forms live on the series, they're shared across all your editions — set them up once and every run uses them.
Building a form
Clicking Configure opens the form editor, headed "Build your registration form". Here's how to put one together.
-
Give it a name
Type a Form name at the top so you know which form you're working on.
-
Add your first question
Click + Add question. Each question can be one of a few types — pick whichever fits what you're asking:
- Single choice — pick exactly one answer.
- Multi-select — tick all that apply.
- Quantity — choose how many.
- Number — type a number.
- Text — a short written answer.
- Long text — a longer written answer.
- Date — pick a date.
-
Attach a price, if the answer costs money
An answer option can carry a price — a € amount in the option's own box — so choosing it charges that amount, and those option prices simply add up. When a price instead depends on a combination of two answers, use a cross-field rule — see Pricing that depends on two answers below. This is how a form doubles as the thing that decides what someone pays.
-
Say why you're asking
Every question needs a short reason for collecting it. This is a privacy requirement — it keeps you honest about why you need each piece of information, and it's what attendees can read if they wonder why you're asking.
Those reasons aren't filed away out of sight. Yuimaru builds them into a published data policy for the edition — a page listing each question next to your reason for it. Attendees reach it from the bottom of every page of your event ("How this event uses your data"), before they register and without an account; it's what the consent tick-box links to; and each registrant keeps the copy they accepted. Write the reasons as you'd want to read them.
-
Preview, then save
Click Preview to fill the form in yourself and see exactly what people will see. Happy with it? Press Save form.
Pricing that depends on two answers
Most pricing is just option prices adding up: a "Full weekend" ticket costs one amount, a "meal plan" adds another, and the total is the sum. But sometimes the price of one choice depends on another — a private room costs more at the full-weekend rate than at the day rate, say. That's a cross-field price: it's read off a grid of two questions rather than added on. (In spreadsheets you'd call it a pricing matrix.)
The form editor has two pricing modes, chosen at the top of the pricing area:
- Cross-field pricing — the default. Per-option prices still add up, and on top you can add cross-field rules for combinations.
- Price per registration — one flat price for everyone, ignoring the answers. Use this when sign-up is a single fixed fee.
To build a cross-field rule, staying in Cross-field pricing:
-
Make the two questions single-choice
Only single choice questions can be the axes of a grid (each registration lands on exactly one row and one column). If you don't have at least one single-choice question yet, the editor tells you to add one first.
-
Add the rule
In the pricing area press + Add rule and give it a name (e.g. "Ticket price") — the name shows on the attendee's price breakdown.
-
Choose the two axes
Set "Price varies by" to your first question and your second. Leave the second as "— single axis —" if the price only depends on one answer.
-
Fill in the grid
The rule shows a table: the first question's options run down the rows, the second's across the columns. Type the price into each cell. A blank cell means no charge for that combination.
Ticket ╲ Room Shared Private Full weekend €180 €240 Single day €70 €110 Here a private room is €60 more at the weekend rate but €40 more per day — a difference you couldn't express by adding a fixed "private room" price, which is exactly what the grid is for.
-
Preview to check
Hit Preview and fill the form in different ways; the running total updates from the grid so you can confirm each combination charges what you meant.
Single-axis rules — a price that varies by one answer
Leave the second box on "— single axis —" and the grid collapses to a single Price column: you set one price per option of the first question. Reach for this when a base amount depends on just one choice — the ticket type, say — and you'd like it to read as one tidy named line (e.g. "Ticket price") on the attendee's receipt.
| Ticket type | Price |
|---|---|
| Full weekend | €180 |
| Single day | €70 |
A single-axis rule does the same job as putting a price on each of that question's options — the difference is presentation: the rule gives you one named line and a place to grow a second axis later, while option prices sit on the options themselves. Choose whichever reads more clearly for that form.
Use either a single-axis rule or per-option prices for a given question — not both. They add up independently, so setting both on the same question charges the amount twice.
Stacking prices — how it all adds up
Yuimaru charges the sum of everything that applies: every priced option the person picked, plus every cross-field rule that works out to an amount. Nothing ever replaces anything — prices only add. A rule whose matching cell is blank simply contributes nothing.
So you can layer as many rules as you need with + Add rule. A festival might run one rule for the base ticket (Ticket × Room) and a second for catering (Diet × Nights); each is worked out on its own and added to the total. On the attendee's price breakdown every piece shows as its own line — priced options under the question they came from, and each rule under "Pricing" labelled with the rule's name — and the grand total is the sum of the lines:
| Line | From | Price |
|---|---|---|
| Ticket price (Full weekend · Private) | Pricing rule | €240 |
| Meal plan (Vegan · 2 nights) | Pricing rule | €30 |
| T-shirt (M) | Option price · Merch | €20 |
| Total | €290 |
A grand total of €0 means the sign-up is free and skips the payment step entirely. Whatever the grids say, the charge is always computed on the server from your form — the attendee's browser can't change it.
You can try the whole form yourself at any point: Preview opens it exactly as an attendee sees it, with the itemised breakdown and running Total updating as you answer. Pricing is easy to get subtly wrong — a blank cell, a rule on the wrong axis, a question priced twice — so we strongly recommend previewing and filling the form in as a few different people would before you publish. It's the quickest way to catch a mispriced combination, and far kinder than an attendee finding it at checkout.
Payments
Under Payments you decide how attendees pay you. The screen opens with the line that matters most: "Attendees pay you directly — the money never passes through Yuimaru, and we take no cut."
Everything on this screen is folded away behind one tick box: "This series charges for registration". Leave it off and every registration is free and the price fields vanish from your registration forms — prices you've already set are kept, so switching back restores them. Tick it and the rest appears.
Country and currency
First two fields: Country of registration (where your organisation is registered) and Currency. There's one currency per series — it applies to every price, every payment and every invoice.
A price field holds a plain number, not a converted amount. If you set your prices in one currency and switch later, the numbers stay exactly as typed and are simply charged in the new currency — 35 becomes 35 dollars rather than being converted from 35 euros. So pick the currency first, and if you ever do change it, re-read your pricing grids before you publish.
Bank transfer, or a payment provider
Next is the choice of how the money reaches you, as a tick box: "Require bank transfer instead of a payment provider". It starts ticked, because bank transfer is the one option that needs no third-party account at all.
- Ticked — bank transfer. Attendees are shown your bank details and pay by transfer. Each registration stays pending until you confirm the money arrived with Mark as paid.
- Unticked — a payment provider. Attendees pay by card on the spot and their place is confirmed instantly. You connect your own account with one of the providers below.
With bank transfer on, you must fill in Bank transfer instructions — Yuimaru won't let you save without them, since attendees would have nowhere to send the money. The text is shown on screen and emailed, and you can drop in {amount}, {reference}, {name} and {workshop}, which are filled in per registration.
Choosing a payment provider
Untick the bank-transfer box and a Payment provider choice appears, with two buttons:
- Mollie — for organisers registered in the EU/EEA. Keys live in the Mollie dashboard under Developers → API keys.
- Stripe — available in 40+ countries, including the US, UK, Canada and Australia. In the Stripe dashboard go to Developers → API keys and create a restricted key with write access to Checkout Sessions. Nothing here needs a full secret key.
Both are trusted, established companies that collect the card payment on your behalf and pay the money straight into your own bank account. Yuimaru just connects to whichever one you pick — the money never passes through us, and we never see a card number. If you're in the EU/EEA either works; outside it, Stripe is usually the one that covers you.
Under the provider is a Mode switch — Test lets you try the whole flow without real money, Live takes real payments — and then a test API key and a live API key for the provider you chose. You need a key for the mode you're actually in: Yuimaru refuses to save a series that charges but has no way to collect.
An API key is just a long secret code your provider gives you, so Yuimaru can talk to your account there securely. Copy it from their dashboard and paste it in. Keys are stored encrypted and never shown again — afterwards you see only the last four characters and a Replace button.
Step-by-step guides: docs.mollie.com — API keys · docs.stripe.com — API keys.
Last comes Business details for invoices, folded up because it only affects what prints on receipts: Legal / business name, Billing email, Address, and Tax / VAT number. Open it, fill it in, and click Save payment settings.
Attendees pay you directly, into your own account. Yuimaru does not take a cut of ticket money — the whole amount is yours.
Publication — making the series public
Everything above stays private until you say otherwise. The last section, Publication, is the switch that puts your series out in the world. Until you flip it, nobody can find or register for your festival — so take your time filling the rest in first.
Because it's a deliberate step, you first tick a box that reads "I understand this will go live and people will be able to access and register for this series." Then press Publish series ›. Once live, the section shows Published — live, and an Unpublish series button lets you take the whole thing back off the public site at any time.
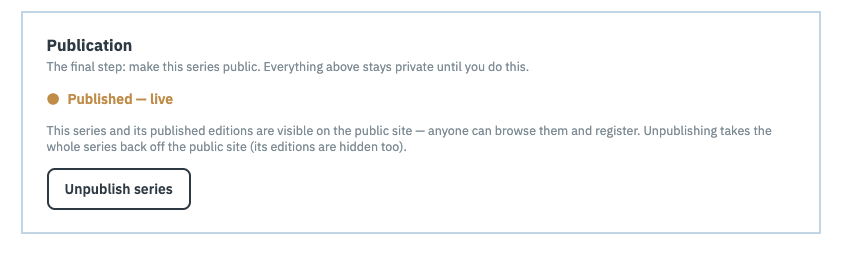
There are two publish switches, and both must be on for people to sign up. Publishing the series (here) puts your festival brand on the public site. Publishing an edition (in the edition wizard, next chapter) makes one particular run live. A published series with only draft editions simply shows nothing to register for yet.
Common questions
What does publishing the series do?
It makes your festival brand public — it appears in the public listing, and any edition you've also published becomes live so people can browse the programme and register. Until you publish, everything stays private and only you can see it. You tick an acknowledgement box, press Publish series ›, and you can Unpublish again whenever you like.
What's the difference between series settings and edition settings?
Series settings apply to every run of your festival — the image, description, registration forms, and payment setup live here so you only do them once. Edition settings are for one particular run — its dates, venue, rooms, and schedule. You'll meet those in the next chapter.
Mollie or Stripe — which should I pick?
Mostly it's decided by where your organisation is registered. Mollie covers organisers in the EU/EEA. Stripe is available in 40+ countries, including the US, UK, Canada and Australia. If you're in the EU/EEA both will work, so pick whichever you already have an account with. Attendees get the same experience either way.
What's an API key and where do I get it?
It's a long secret code that lets Yuimaru connect to your payment account to take card payments. Make a free account with your provider, then copy the key from their dashboard and paste it into the Payments screen. In Mollie it's under Developers → API keys (guide); in Stripe it's also under Developers → API keys, where you create a restricted key with write access to Checkout Sessions (guide). Keys are stored encrypted and never shown again — press Replace to change one.
Card or bank transfer — which should I pick?
Cards (through Mollie or Stripe) are the smoothest for attendees: they pay on the spot and their place is confirmed instantly. Bank transfer needs no account with anyone, but each sign-up stays pending until the money arrives and you mark it paid by hand. Pick cards for convenience, bank transfer if you'd rather not connect a payment provider at all.
Can I charge in a currency other than euros?
Yes. Currency is on the Payments screen and you can pick any standard currency your provider supports. It's one currency for the whole series — every price, payment and invoice uses it. Set it before you start pricing: price fields hold plain numbers, so changing the currency later doesn't convert anything, it just charges the same numbers in the new currency.
Why does every question need a reason?
It's a privacy safeguard. Recording why you collect each piece of information keeps you within data-protection rules and lets attendees see exactly why you're asking. It also nudges you to only ask for what you genuinely need. The reasons are published as your edition's data policy, so attendees can read them before signing up — and each registrant keeps the version they accepted, which doesn't change when you edit the form later.
Does Yuimaru take a cut of my ticket money?
No — Yuimaru takes 0% commission on tickets. Attendees pay you directly through your own payment account or bank, and the full amount is yours.