Organiser Guide › Running an event › Registrations & payments
Organiser
Registrations, tickets & payments
This is where you see who signed up, confirm their payment, and send out their tickets. Everything about who's coming to your event lives on this one screen.
Getting to registrations
Open your series, and in the top bar you'll find a Registrations link. Click it to reach the "Registrations & payments" screen.
In the top-right are two export buttons. Export CSV saves the whole list as a spreadsheet file (a CSV opens in Excel or Google Sheets) so you can keep your own copy. Marketing emails exports just the contacts who agreed to hear from you — handy for a newsletter, and it keeps you on the right side of the rules by leaving out anyone who didn't opt in. Along the top are filter buttons — all, pending, approved, and cancelled — so you can show just the people you're interested in.
 Registrations & payments
Export CSV
Registrations & payments
Export CSV
Reading the table
Everyone who signed up appears as a row. The columns are:
- Registrant — their name and email. Click it to open their full details.
- Workshop — the session they signed up for.
- Status — where they are in the process (see below).
- Amount — what they owe or paid.
- Ticket — the ticket code, once it's been issued.
- Actions — the buttons for approving or rejecting them.
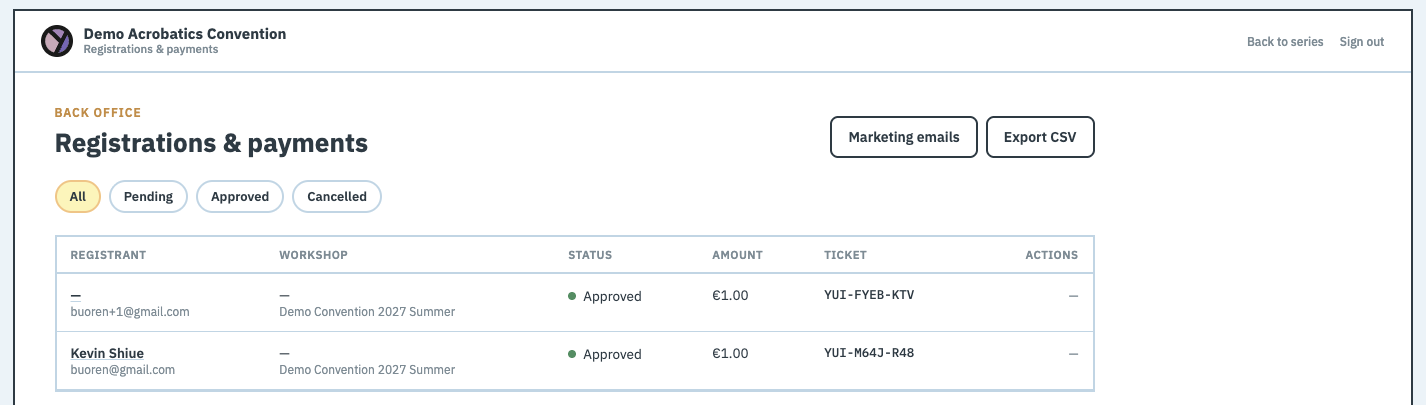
The Status shows as Pending, Approved, Cancelled or Rejected, each with a small coloured dot so you can scan the list quickly.
Approving people
For a sign-up that's still Pending, you'll see buttons in the Actions column. Here's what each one does, in plain words:
- Approve — confirms the person and issues their ticket.
- Reject — turns them away and voids the ticket.
- Mark as paid — how you confirm you received a bank transfer, which then issues the ticket.
You'll see Approve for most sign-ups, and Mark as paid instead when the person is paying by bank transfer.
Approving a sign-up, step by step
-
Filter to pending
Click the pending button at the top to show only the people waiting for a decision.
-
Find the person
Look down the list for their name. You can click their name to open their full details first if you'd like to double-check something.
-
Click Approve
In the Actions column, click Approve. This confirms them and issues their ticket straight away.
Confirming a pending sign-up Approve Reject -
Their ticket appears
The status changes to Approved and a ticket code shows in the Ticket column. They'll get their ticket automatically — you don't have to send anything by hand.
Taking payment by bank transfer
If you accept bank transfers, sign-ups behave a little differently.
When someone pays by bank transfer, their sign-up stays Pending until the money actually arrives in your account. Once you can see it there, open their row and click Mark as paid. That confirms the payment and issues their ticket. Yuimaru can't see your bank account, so this one step is always yours to do.
The details pop-up
Clicking a registrant's name opens a small window with everything about them: their name, email and status, then a grid of facts — Registered as, Amount, Workshop, and Ticket (which reads "Not issued yet" if they don't have one). Below that are all their Registration form answers — anything they filled in when they signed up.
Nothing in the window can be edited — form answers are changed in the form editor, not here — but if the sign-up is still Pending, the Approve and Reject buttons sit at the bottom too, so you can decide right after reading. Click Close to dismiss it.
Letting a teacher vet their own sign-ups
Some sessions are better judged by the person teaching them — an advanced class where the teacher knows what "ready" looks like. On a workshop that takes its own registrations you can tick "I approve each registration" (see chapter 4), and the yes/no for that session passes to its teacher.
What that means in practice:
- The teacher gets a Registrations link of their own in the Back Office, holding only the sign-ups for workshops they teach. They never see the rest of your series.
- They decide from the profile the registrant shared at sign-up — the person's community profile, shown right next to the Approve and Reject buttons. It's shared for exactly this purpose, and once a registration is rejected or cancelled the teacher stops seeing it.
- Rows that work this way are marked "Teacher approves entries" in your own list, so you can tell at a glance which decisions aren't yours.
- Money stays entirely with you. The teacher approves a person; payments, refunds and everything else remain on this screen.
Handing the decision to a teacher doesn't take it away from you — your own Registrations screen still shows every sign-up in the series, with the same Approve and Reject buttons. It's about who is expected to look, not about locking you out. If a teacher is slow, just decide it yourself.
Common questions
What does Approve do?
It confirms the person's place and issues their ticket right away. Their status changes from Pending to Approved, and their ticket code appears in the table.
How do I confirm a bank transfer?
Wait until the money arrives in your account, then open that person's row and click Mark as paid. That confirms the payment and issues their ticket. Until then, they stay Pending.
What's the difference between Reject and Cancel?
Reject is what you do to a sign-up you're turning away before it's confirmed — it voids the ticket. Cancelled means a place that was called off. In both cases the person isn't coming, but Reject is your decision on a pending request, while Cancelled reflects a booking that was undone.
What's a CSV export for?
The Export CSV button downloads your whole list as a spreadsheet file. Open it in Excel or Google Sheets to keep your own copy, make a check-in sheet, or share the numbers with a co-organiser.
When does someone get their ticket?
The moment you Approve them — or, for a bank transfer, the moment you Mark them as paid. The ticket is issued automatically; you don't have to send it yourself.